
![]()
![]()
![]()

Adding a custom search result Column (metadata) to MOSS Advanced Search |
Sep
07
|
| « You receive an HTTP Error 401.1 error when accessing a SharePoint 2007 or SharePoint 2010 site on a web front end | Automatically Redirect HTTP requests to HTTPS using ASP » |
Summary
You may have a human resources document library where the users would like to search by the “SocialSecurityNumber” column property that was manually populated during the uploading of a document. You could follow these steps to make the “SocialSecurityNumber” SharePoint column “selectable and searchable” from the SharePoint Advanced Search Template.
Below is a summary of the different sections of this article and what the section covers:
-
Adding Metadata Property Mapping – This step changes the column to a manageable field within SharePoint, if a unless its managed it is not searchable when a crawl is ran. This can be done manually or automatically.
- Manually adding Metadata Property Mapping
- Automatically adding Metadata Property Mapping
-
Adding a field to MOSS Advanced Search – This step adds the column name to the dropdown box in the MOSS Advanced Search, there are 2 edits you have to make, the PropertyRef’s tag and the ResultsType ProperyRef tag.
- Editing the “PropertyRef” tag
- Editing the “ResultTypes” “PropertyRef” tag
- Testing – This step covers testing of your changes
- Errors – This step covers a couple of known error messages
Adding Metadata Property Mapping
This article will describe how to add the column “test” to the advanced search dropdown box and make it “searchable”. This procedure can be duplicated for any column type.
Manually adding Metadata Property Mapping
“
- Go to Central Administrator
- Go to Shared Service Provider Administrator (http://CENTRALADMINURL/ssp/admin)
- Select “Search Settings” from the option in the search menu
- Select “Metadata Property Mappings”
-
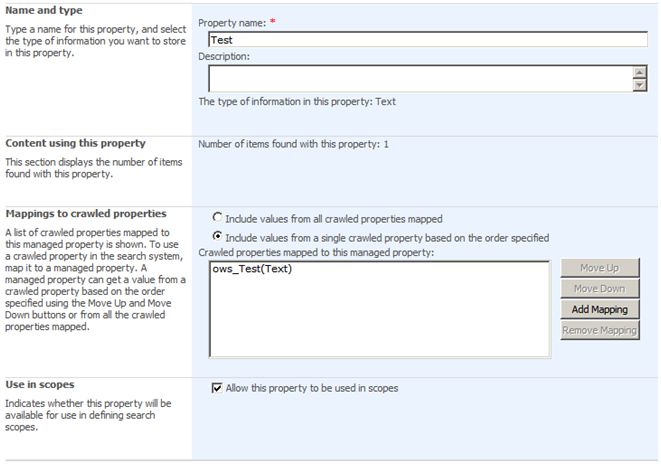
Select “New Managed Property” (Figure 1.1)
- Type in the property name, this should match the column name
- Set the type, this should be the same type of value as when you created the column
- Select “Include values from a single crawled property based on the order specified” and click add mapping. The quickest way is to do a test for the column name. In this case it is ows_Test(Text). This property will not show up unless you have preformed a full or incremental crawl and they need to be populated with data or they will not show up.
- Select “Allow this property to be used in scopes”
- Click OK
Figure 1.1 New Managed Property window
Automatically adding Metadata Property Mapping
“
- Go to Central Administrator
- Go to Shared Service Provider Administrator (http://CENTRALADMINURL/ssp/admin)
- Select “Search Settings” from the option in the search menu
- Select “Metadata property mappings”
- Select “Crawled Properties” from the menu on the left
-
Go to “SharePoint” folder, select the drop down menu and select “Edit Category”
- Make sure the following three checkboxes are checked off Automatically discover new properties when a crawl takes place
- Map all string properties in this category to the Content managed property.
- Select “Automatically generate a new managed property for each crawled property discovered in this category”
-
Press OK (new property will not show up unless you have preformed a full or incremental crawl and they need to be populated with data or they will not show up)
“
Adding field to MOSS Advanced Search
- Go to the MOSS site where you which to perform the search
- Select “Advanced Search”. If Advanced Search is unavailable then you have created the site with a template that does not contain a search center. You will need to add a search page to the site from Site Settings >
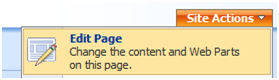
- Select “Edit Page” from the “Site Actions” menu
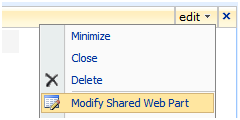
- Select “Modify Shared Web Part” under the “edit” menu
- Under the properties of the web part select the “Ôò¼├┤Ôö£├ºÔö¼┬¼” link next to properties field under the properties section
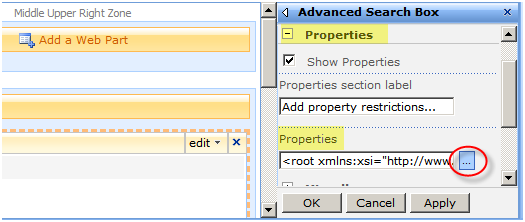
- Copy all of the content from the popup window into notepad. You will need to edit 2 sections
Editing the “PropertyDef” tag
Look for the section with the “PropertyDefs” tag. Create a new entry as displayed below, make sure it matches the data type you selected when you created the “Metadata Mapping” earlier and also make sure the “name” matches the column name
<PropertyDefs>
<PropertyDef Name=”Path” DataType=”text” DisplayName=”URL”/>
<PropertyDef Name=”Size” DataType=”integer” DisplayName=”Size”/>
<PropertyDef Name=”Write” DataType=”datetime” DisplayName=”Last Modified Date”/>
<PropertyDef Name=”FileName” DataType=”text” DisplayName=”Name”/>
<PropertyDef Name=”Description” DataType=”text” DisplayName=”Description”/>
<PropertyDef Name=”Test” DataType=”text” DisplayName=”Test”/>
<PropertyDef Name=”Title” DataType=”text” DisplayName=”Title”/>
<PropertyDef Name=”Author” DataType=”text” DisplayName=”Author”/>
<PropertyDef Name=”DocSubject” DataType=”text” DisplayName=”Subject”/>
<PropertyDef Name=”DocKeywords” DataType=”text” DisplayName=”Keywords”/>
<PropertyDef Name=”DocComments” DataType=”text” DisplayName=”Comments”/>
<PropertyDef Name=”Manager” DataType=”text” DisplayName=”Manager”/>
<PropertyDef Name=”Company” DataType=”text” DisplayName=”Company”/>
<PropertyDef Name=”Created” DataType=”datetime” DisplayName=”Created Date”/>
<PropertyDef Name=”CreatedBy” DataType=”text” DisplayName=”Created By”/>
<PropertyDef Name=”ModifiedBy” DataType=”text” DisplayName=”Last Modified By”/>
</PropertyDefs>
“
Editing the “ResultTypes” “PropertyRef” tag
Look the section with the “PropertyRef” tag. There are a couple of different “PropertyRef” sections, make sure to select the one with the property “Display Name=”All Results””. Add a new entry as displayed below. The name should match the column name.
<ResultTypes>
<ResultType DisplayName=”All Results” Name=”default”>
<Query/>
<PropertyRef Name=”Author” />
<PropertyRef Name=”Description” />
<PropertyRef Name=”FileName” />
<PropertyRef Name=”Size” />
<PropertyRef Name=”Path” />
<PropertyRef Name=”Test” />
<PropertyRef Name=”Created” />
<PropertyRef Name=”Write” />
<PropertyRef Name=”CreatedBy” />
<PropertyRef Name=”ModifiedBy” />
</ResultType>
-
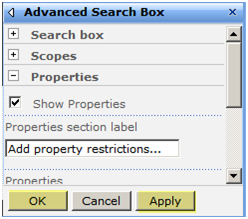
Copy the whole modified XML schema back into the popup window and press OK. Then press Apply then OK on the Advanced Search Box window.
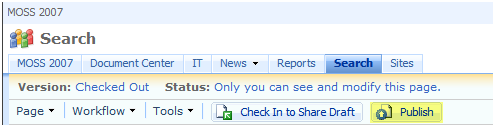
2. Select Publish from the top of the search window
“
3. You have to perform a full crawl on the site to be able to search one of the custom fields. During testing, we performed an incremental crawl however it did not return any search results until we preformed a full crawl.
“
Testing
Successful Test
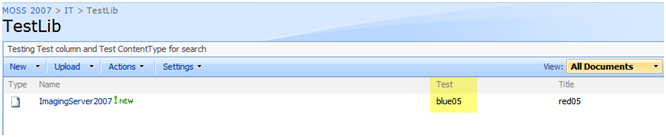
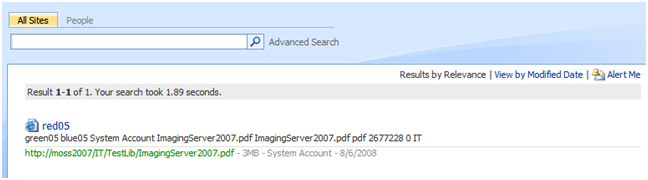
We will attempt to search for the “blue05” metadata under the “test” column. As you can see the document “red05” contains the “blue05” metadata in the “test” column
Searching for blue05 under Test

The search results are successful this returned the “red05” document with the “blue05” metadata under the “test” column.
Unsuccessful Test
Searching for “red05” metadata under the test column. This search should not work because “red05” is under the “title” column and not under the “test” column.

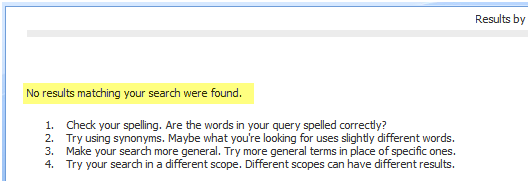
This does not return any results because the column “test” only contains the metadata “blue05”
Errors
- Property doesn’t exist or is used in a manner inconsistent with schema settings. – If you do not add the metadata field in search settings or run a crawl after you create the metadata mapping you will get this error.
- No results matching your search were found. – If you did not run a full crawl after adding the field to the XML schema, you will get this error.
“
“
“
“
“
“